


I taught the Wilton Method of cake decorating for many years, and on the first night of class, I always asked my students what they hoped to learn. Why were they taking the class? The most popular response by far was that they wanted to be able to create beautiful cakes for their kid’s birthdays.

They wanted to save money, do something creative, and see that big ole smile on their kid’s face when they saw the beautiful birthday cake that Mom made just for them.
I helped hundreds of ladies find the tools and develop the skills they needed to make professional-looking cakes in their very own kitchens. I also learned some simple tricks along the way that I want to share with you so you can do the same, regardless of your skill level or artistic talents.
If you want to take your cakes from “Failed it” to “Nailed It!” listen up as I walk you through the process.
Step 1: Bake the Cake
I suggest keeping it simple by using a boxed cake mix. Pillsbury White and Duncan Hines Dark Chocolate Fudge are my favorites. Make sure you have a good cake pan, spray it with non-stick spray, and follow the instructions on the box. The only thing I do special is mix the cake mix by hand, just enough to get all the lumps out. Then I bake it at 335F instead of 350F, and take it out as soon as a knife inserted into the middle comes out clean. The key to a moist delicious cake is to not overbake it!

Step 2: Frost the Cake
Below is the frosting recipe I use. It’s delicious — you can thank me later.
Ingredients:
1 pound confectioners’ sugar
1 stick unsalted butter
1/2 cup shortening
1 teaspoon flavoring (my favorites are vanilla and almond)
5 teaspoons of water or milk
1 tbsp meringue powder (this is optional, but helps the frosting hold its shape)
Directions:
Mix the butter, shortening, water and flavoring until smooth. Then add the dry ingredients a bit at a time until fully incorporated and smooth. If your frosting is too thick, add more water (1 teaspoon at a time). If it’s too thin, add more confectioners’ sugar.
Frost your cake using a large spatula, and make sure the sides and top are smooth so you have a good canvas for your decorations.
Step 3: Decorate the Cake
If you’re artistically challenged, I have a fail-safe decorating technique for you: the icing transfer!
Here’s how it works: you find an image online. It could be your kid’s favorite cartoon character or sports team or whatever. Print it onto a piece of paper, sized to fit your cake.
Then put a piece of wax or parchment paper over the image, and trace it with a pen. Then flip the parchment paper over, and trace it again with thin white or very lightly tinted frosting (you can use a frosting bag with a very small round tip for this). Then place the paper, icing side down, on your cake (make sure you place it exactly where you want it on the cake), and be gentle so you don’t blur the frosting. Trace over the image with your finger to “transfer” the icing from the paper to the cake, then gently lift the parchment paper off of the cake and discard it.
Now you have the exact image that you printed transferred onto your cake. You can outline it with black, then fill it in with colors of your choice, or whatever makes sense for your design.
You can use this same technique for lettering to write “Happy Birthday.” I do this every time I have to write on a cake because without some kind of guideline, my handwriting on cakes looks like something my 18-month-old might do. 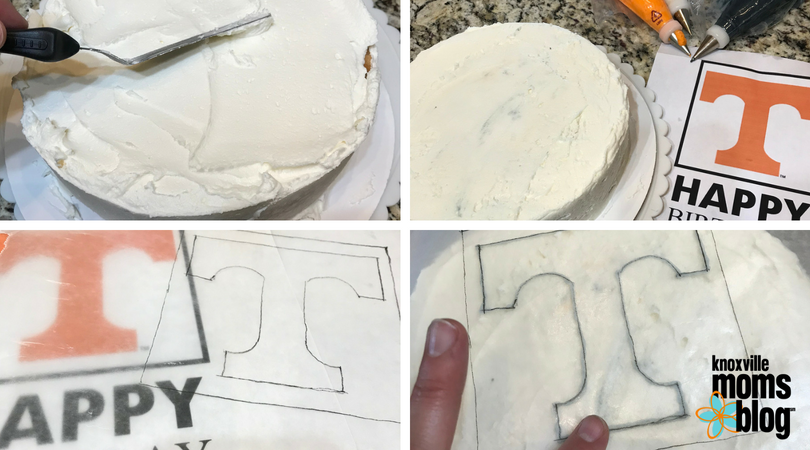
Finish off your cake with a border in a coordinating color. You can use a large round tip for a dot border, or a large star tip for a traditional shell border like I’ve done here.
You can also put some dots, stars, grass, flowers, or other decorations as you see fit.


That’s awesome advice on the lettering. I’ll have to give that go!